Saturday, May 9, 2009

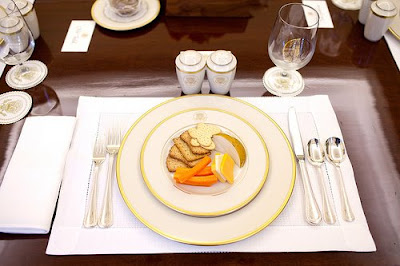
Obama's Afternoon Snack


Wouldn't you just love for someone to make you a snack like this every afternoon! (The rest of the photos from his first 100 days are pretty cool, too!)

Thursday, April 30, 2009

Dying Old Jeans


I have two pair of jeans I love that had gotten very faded, so I decided to experiment with them. The pair on the right were even lighter than the pair on the left. I used one bottle of black Rit dye and dyed them this afternoon. It worked pretty well, but there are a few spots of slightly uneven color. I think next time I'll use a bigger bucket with a bit more water so the fabric can move around more freely. I have a front loading washer, so a bucket is really my only option. The only hard part was rinsing the dye after it was done soaking. It took about 20 minutes of rinsing and squeezing until the water was almost clear. I used rubber gloves for the first 15 minutes of the rinsing, but then they filled with water and I gave up on them. After rinsing I ran them through the washer with an extra rinse cycle to try to get all the dye out. On the other pair I'm going to try Rit Denim Blue. I'm really looking forward to wearing them now that they're not pale blue!

Sunday, April 19, 2009

Cupcake Bites

I saw Bakerella make cupcake pops on Martha Stewart last year and thought they were cute, but too much work. (And check out what she did for Easter! The picture at the end of this post is just crazy. This woman must make pops 24/7.)
Then I saw her make Cupcake Bites over at Pioneer Woman. I realize that they're almost the same, but somehow these seemed easier to handle.
After our week of birthdays in March we had half of a single layer frosted cake just sitting on the counter calling to me. So I smushed it up and formed the balls.

I melted some white chocolate bark and added a little bit of purple food coloring gel. I think I would add more purple next time for a brighter color. I put a dollop of the purple chocolate into the plastic mold. I think this mold was originally intended for peanut butter cups. Then I put a cake ball into each spot.
I was impatient to get to the next step, so I put the mold into the freezer for a few minutes to firm up the purple chocolate. It worked.

Then I dipped each one in melted chocolate. You kind of have to work quickly because the purple chocolate will start to melt a little bit if you hold on too long.

After dipping I added an M&M and some sprinkles. I think they turned out really cute, but I'm not sure I'd need to make a whole batch (40+ cupcake bites??) Next time I have half of a single layer cake sitting around not getting eaten I'll definitely make these again, though. The kids loved them!

Sunday, April 12, 2009

Fantastic idea!!!

http://craftgawker.com/

Monday, April 6, 2009

Salt & Pepper Potato Crisps


So I recently found out I had an ulcer and have been experimenting with different foods to find things that aren't irritating. Potatoes work, but they get boring after awhile. I found this recipe on Foodgawker.com this morning and gave it a shot.


Potatoes
Salt
Pepper
Olive Oil

Preheat oven to 400. Slice potatoes very thin. A mandolin would work best so they are even! Spread on baking sheet and drizzle with olive oil. Bake for 20 minutes, turn and sprinkle with salt & pepper (I added a little seasoned salt too). Bake for another 5 minutes or until crisp.


The finished product....they were actually really good! Very crispy and crunchy. I would cut down the initial baking time to 10 minutes, then flip and bake another 10 minutes, just to even the browning a little bit.

Wednesday, April 1, 2009

April Fool's Day


Our April Fool's Day started with Daddy finding a snake in his sock drawer. At lunch, this was our centerpiece. The kids knew something was up, but couldn't quite figure it out. They kept asking why there were gummy worms in the dirt of the plant. The pot is filled with chocolate pudding and topped with crushed Oreos. They pronounced it their favorite lunch EVER.

Monday, March 9, 2009

Multicolr Search Lab


Multicolr Search Lab lets you search Flikr by color. Useful? Maybe. Fun? You bet!

Possibly stupid ways to save money


There is no logic to what I will spend money on and what I hate to buy. For example, I don't think twice about buying DiorShow Mascara at $25+ a pop, but I think $5.00 is outrageous to spend on laundry detergent. And $5.00 is basically the low end, cheap stuff, we're not talking about my favorite, Gain. As I'm trying to save money wherever I can, I decided I could make my own laundry detergent.

There are 2 kinds I found-the dry powder kind and "liquid" which is actually more like a gel. I chose dry because all the recipies for the liquid seemed like a giant pain in the behind.

Ingredients:
1 bar Fels Naptha Soap, grated ($.97)
1 cup Borax (whole box was $2.50)
1 cup Washing Soda (NOT baking soda) (whole box was $2.97)

Grate soap. (Picture #2) Mix with Borax and Washing Soda. (Picture #3) Use 2 Tablespoons per load. (I mix my 2 tablespoons with a little water and let it mostly dissolve before I put it in. Not supposed to use powder with my septic tank)


The hardest part was grating the soap...the beginnings of carpal tunnel and grating soap do not go together very well. A normal person would probably find this easy, but it took me probably 15-20 minutes to get it all grated. I washed a test load of towels this morning, will report back tonight with pictures and the results!!!


Update-I've done several loads now and I have to say it seems to work well. I have really really hard water and this stuff doesn't leave any kind of residue. I use vinegar in the bleach dispenser when I use regular detergent, plus an additional rinse cycle. I haven't had to use any vinegar and have been able to cut out the additional rinsing. It definitely does not smell like normal laundry, really it has no scent at all other than clean smelling. I'm giving it a thumbs up!

Monday, March 2, 2009

Depression Cooking with Clara


Depression Cooking is a very cute video series starring 93 year-old Clara showing how to cook some of her family's meals from the 1930s. I love how she cuts everything right in her hand. That's how my grandma did it, too. I'm not sure I need to rush and make any of these meals right now, but in another year we may all be needing Clara's advice! I've watched about 3 of them so far and they're definitely worth a few minutes of your time.
You can find all of the episodes on the Depression Cooking page on YouTube.

Friday, February 20, 2009

Cake and Yogurt-a quick review

So Yoplait has all kinds of new flavors now and they all seem to be baked goods related. I find this to be weird, but I gave them a shot anyway.

Cherry Cobbler-this was a weird pinky-red color and tasted worse than Maraschino cherries, which in my book is pretty bad.

Cinnamon roll-this was the color of a Flesh colored Crayola crayon. Terrible color aside, it wasn't bad, sort of a combo of weak cinnamon and cream cheese icing.

Pineapple Upside Down Cake-Strangely enough, this was the winner of the bunch. It actually smelled like pineapple and cake and even tasted a little cakey. The pineapple is what made it good, though. This one I would definitely get again.

Apple Turnover-not a new flavor, but one of my favorites. Another weird yogurt flavor, but very tasty apple & cinnamon

Lemon Meringue Pie-very important, you have to get the Yoplait Light Thick & Creamy version, NOT the regular texture light yogurt (which is actually Lemon Creme Pie flavored). My favorite yogurt EVER. It's not exactly lemon curd, but still a little tart and yummy. I need to get some graham crackers and try mixing it with the yogurt.

Sunday, February 8, 2009

Almond Coffee Syrup


I've been looking for almond coffee syrup in stores near me for a while and cannot find it. Many have sugar free almond coffee syrup, but I've tried a few different brands and they all taste terrible. The sugar free vanilla and sugar free caramel taste fine, so I don't really understand why the sugar free almond is terrible, but it is. I've looked online and one can certainly order regular almond syrup from many different places, but shipping is just as much or more than the cost of the syrup. So, I decided I'd try making my own. I couldn't find a recipe so I just made simple syrup and added almond extract a little at a time until it tasted strong enough to flavor my iced coffee. I'm so glad I did this! It's fast, easy and cheap. I'll be making my own vanilla syrup from now on, too. I think the vanilla syrup may take a bit more than 1 tsp vanilla. I'll post an exact recipe once I make it.

Almond Coffee Syrup
2 c sugar
1 c water
1 tsp almond extract

Heat sugar and water on medium until liquid is clear (3-5 minutes). Do not boil. Remove from heat and stir in almond extract. Allow to cool. Pour into a bottle using a funnel. Store in refrigerator.

UPDATE:
After a few iced almond lattes, I decided that it wasn't almondy enough. So I upped the almond to 2 tsp and I think it's perfect. It's quite almondy, so you don't have to add so much syrup to your latte. You get a good almond flavor without it being sickeningly sweet.

Almond Coffee Syrup - UPDATED
2 c sugar
1 c water
2 tsp almond extract


Thursday, January 29, 2009

Turkey Joes

I made a conscious effort this week to not buy any new food, but to use up what I had. Great idea on a Sunday, not so great by Thursday when the cupboards are getting bare. My original idea was to make tacos but had none of the accompaniments. Turkey Joes it is.

I grew up eating the following Sloppy Joes:

Ground Beef
Ketchup
Mustard
Brown Sugar

Don't get me wrong, I love love love them like that, but they are a little sweet and are probably an acquired taste. Tonight's version was a modified recipe of Rachel Rays.

Brown some turkey/beef/whatever floats your boat. While browning, add some brown sugar and some steak seasoning. Once mostly cooked, add 1 chopped onion and one chopped red pepper. Let that cook for a little bit, then add some vinegar (I used balsamic, it was closest to the stove) & worcestershire sauce to taste. Cook for a minute or two, then add a can of tomato sauce and a can of diced tomatoes. Simmer until thickened. The original recipe mentioned something about toasted buns, but that's too fancy for a weeknight.

They turned out yummy...a little sweet, tangy and hot.

Saturday, January 24, 2009

Puffy Pancake


The kids and I made this Puffy Pancake for dinner the other night. I'd made this recipe once before in muffin tins and thought it might be easier to make in a 13x9 pan. That picture is at about the halfway point. The kids LOVED the goofy shapes it puffed into. Here's what it looked like when it was done (or overdone perhaps.)


It was easier than muffin tins, but it ended up cooking pretty unevenly. I'm not sure if that was due to my pan, my oven or the recipe. Next time I make it I think I will go back to the muffin tins.
I originally found it at Make and Takes, but Catherine Newman has another version here.
Here's the recipe with the changes I made:

Puffy Pancake
makes 24 muffins or one 13x9 pan

1 cup milk
1 cup flour
2 Tbl sugar
1 tsp vanilla
6 eggs
3 Tbl butter, melted
dash salt

Preheat oven to 400. Grease a 13x9 pan or muffin tins.

Mix all ingredients together with a whisk or in the blender. Bake until puffy and golden on top (about 15 minutes for muffins or 20-30 for 13x9 pan.)

My favorite way to eat this is to top it with butter, powdered sugar and a squeeze of lemon. Or you could spread your favorite jam on it or eat it with regular old pancake syrup.

Saturday, January 10, 2009

Glitter and then some...


This is my glitter collection. I call it a collection, see, because I keep buying glitter but never use it.

My goal for January is to actually glitter something. I've picked up some sweetgum balls from my yard and once they've dried out, they will become my first glitter-experiment.

Nothing says Christmas like some glittered sweetgums on your tree!!!

Wednesday, January 7, 2009

Clementine Votives

It's clementine season! I saw this cute votive at apartment therapy and had to try it. Just cut a clementine in half across the center and gently peel out the flesh without tearing the pith. You should end up with a long wick sticking up from the bottom. If you have no wick, feed that clementine to your kids and start again. Fill the bottom with about a teaspoon of olive oil and let it soak for a minute while you cut a cute shape in the top half with a paring knife. Alternatively, you could cheat and use a tiny cookie cutter for a less rustic look. Now, light the wick and place the top back onto your clementine. You gotta love a 5 minute craft!